Network Management
4 min read
The Network Settings in Autonoedge profiles allow administrators to configure Wi-Fi, web filtering, and APN policies on managed devices. These settings help ensure secure, reliable, and compliant network access while simplifying device management across the organization.
Key Benefits #
- Enforce Wi-Fi Policies – Standardize and secure corporate Wi-Fi configurations across all devices.
- Control Web Access – Block or allow access to specific websites using whitelist or blacklist rules.
- Configure APN Settings – Ensure proper mobile data connectivity with carrier-approved APN details.
- Centralized Management – Deploy and manage all network-related configurations from a single console.
Step 1 – Access the Network Menu #
- Log in to your Autonoedge console.
- Navigate to the Profiles section from the left-hand menu.
- Click the “Create New Profile +” button and select Android Edge as the device type.
- In the profile sidebar, select Wi-Fi, Web Filter, or APN to begin configuring network settings.
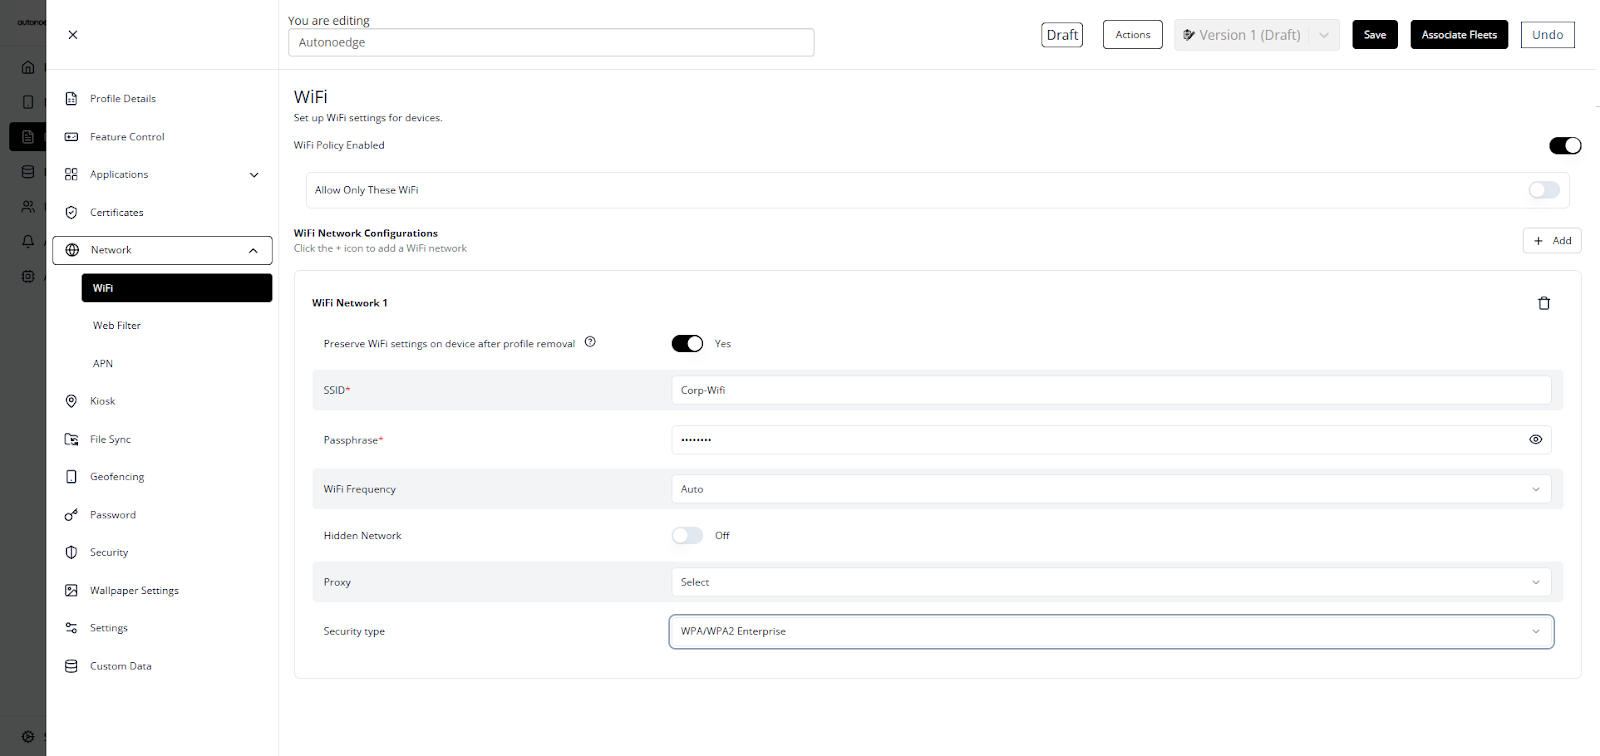
Configure Wi-Fi Settings #
- In the profile sidebar, click Wi-Fi and toggle Wi-Fi Policy Enabled to On.
- Optionally, you may enable Allow Only These Wi-Fi to restrict devices to specific networks.
- Best Practice: Configure at least two networks when this option is enabled.
- Click + Add to add a new Wi-Fi network.
- Fill in the required fields:
| Field | Description | Example |
| SSID | Wi-Fi network name | Corp-WiFi |
| Passphrase | Wi-Fi password | securekey123 |
| Wi-Fi Frequency | Auto-selected or fixed | Auto |
| Hidden Network | Enable if SSID is hidden | Off |
| Proxy | Manual, Auto, or None | None |
| Security Type | e.g., WPA/WPA2, WEP, etc. | WPA/WPA2 Enterprise |
Note: You may add multiple Wi-Fi networks if needed.
Configure Web Filtering #
- In the profile sidebar, click Web Filter and toggle the Web Filter Enabled switch to On.
- Choose the filter type:
- Whitelist – Allows access only to listed websites.
- Blacklist – Blocks access to listed websites.
- Enter one website URL per line — each URL must include the appropriate protocol (http:// or https://).
Whitelist Behavior – Examples and Recommendations: #
| Input | Behavior |
| company.com | – Allows both HTTP and HTTPS. – Allows subdomains (e.g., support.company.com). – Allows www.company.com |
| https://company.com | – Allows only HTTPS. – Allows subdomains (e.g., support.company.com. – Allows www.company.com. – Does not allow http://company.com. |
| www.company.com | – Allows only https://www.company.com. – Does not allow http://company.com or https://company.com. – Subdomains are not allowed. |
Best Option: Use company.com
This ensures broader compatibility (both HTTP and HTTPS) and allows subdomain access. Even if a user attempts to access via HTTP, most modern servers will redirect to HTTPS using the installed certificate.
Note: Web filtering applies only to Google Chrome on supported platforms. Each domain must be entered on a separate line; commas and regex patterns are not supported.
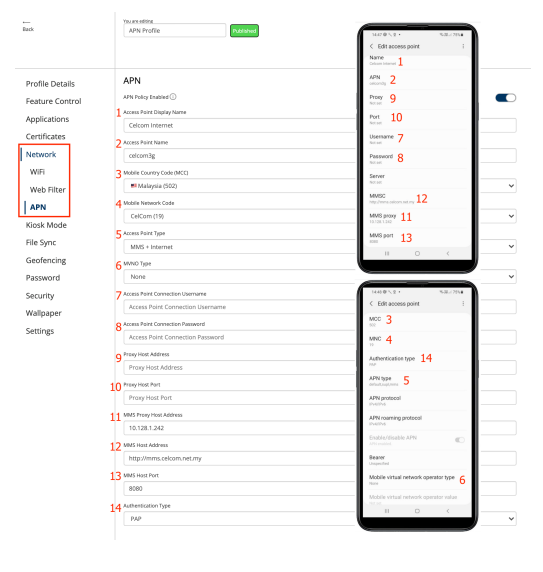
Configure APN Settings #
- In the profile sidebar, click APN and toggle the APN Policy Enabled switch to On.
- Fill in the required fields:
| Field | Description | Example |
| Access Point Display Name | Friendly label to identify the APN configuration. | Corporate Internet |
| Access Point Name (APN) | APN string provided by your mobile carrier. | internet.telco.com |
| Mobile Country Code (MCC) | Numeric code identifying the country of the SIM card provider. | 502 |
| Access Point Type | Defines usage types such as MMS, Internet, etc. | MMS |
| MVNO Type | Type of Mobile Virtual Network Operator match if required. | GID |
| Access Point Connection Username | Username for authentication if required by the carrier. | user123 |
| Access Point Connection Password | Password for authentication if required by the carrier. | pass123 |
| Proxy Host Address | Proxy server address if required. | proxy.telco.com |
| Proxy Host Port | Port used by the proxy server. | 8080 |
| MMS Proxy Host Address | Address of the proxy used for MMS. | mmsproxy.telco.com |
| MMS Host Address | URL of the Multimedia Messaging Service Center (MMSC). | http://mmsc.telco.com |
| MMS Host Port | Port number used for MMS proxy. | 80 |
| Authentication Type | Method used for authentication. | PAP/CHAP |
Note: Available for Android 9.0 (API level 28) and higher.
Autonoedge Profile APN Configuration Example: #
Step 3 – Associate the Profile #
- Once your profile is configured with the desired network settings, associate the profile with the target fleet.
- Once associated, the network settings will be deployed on all devices in that fleet according to the profile settings.
Best Practices & Tips #
- Test Before Deployment: Apply new profiles to a small group before fleet-wide rollout.
- Set at Least Two Wi-Fi Networks for Restrictions: When using “Allow Only These Wi-Fi,” configure at least two networks to prevent connectivity issues.
- Use Clear, Descriptive Names: Label Wi-Fi and APN entries for easier maintenance.
- Enter One URL per Line in Web Filters: Avoid commas and regex patterns; always include the protocol (http:// or https://).
- Prefer Domain-Only Entries: Use entries like company.com for better compatibility and subdomain coverage.
- Verify APN Settings with Carrier: Ensure MCC, MNC, and authentication types are correct to avoid mobile data issues.
- Enable Preserve Wi-Fi Settings if Needed: Keep networks active even after a profile is removed.
- Document Proxy or MMS Settings: Especially important when using custom or private mobile networks.


