Understanding Geofence
4 min read
In Autonoedge, Geofence allows administrators to define virtual boundaries on a map to control device behavior based on location. When a device enters or exits a specified area, Autonoedge can automatically apply or revoke profiles, settings, and restrictions. This helps organizations enforce location-based policies, improve compliance, and enhance security for mobile devices used in the field — no internet required, thanks to on-device logic.
Key Benefits #
- Automated Enforcement – Apply policies automatically based on whether a device is inside or outside a defined area.
- Flexible Configuration – Support scenarios such as regional restrictions, roaming control, or location-specific access.
- Improved Compliance – Ensure devices operate only within designated geographic zones for accountability.
- Offline Reliability – Enforce geofencing rules using Autonoedge’s on-device logic, even without an internet connection.
Before You Begin #
To complete this setup, you’ll need two fleets and two profiles:
- Two Fleets:
- A target fleet for the in-geofence profile.
- A placeholder fleet to keep the out-of-geofence profile active.
- Two Profiles:
- A profile for when the device is inside the defined geofence.
- A profile for when the device is outside the defined geofence.
Step 1 – Create an In-of-Geofence Profile #
- Log in to your Autonoedge console.
- Navigate to the Profiles section from the left-hand menu.
- Click the “Create Profile +” button at the top right of the profile panel.
- Choose the appropriate platform from the dropdown (e.g., Android Edge).
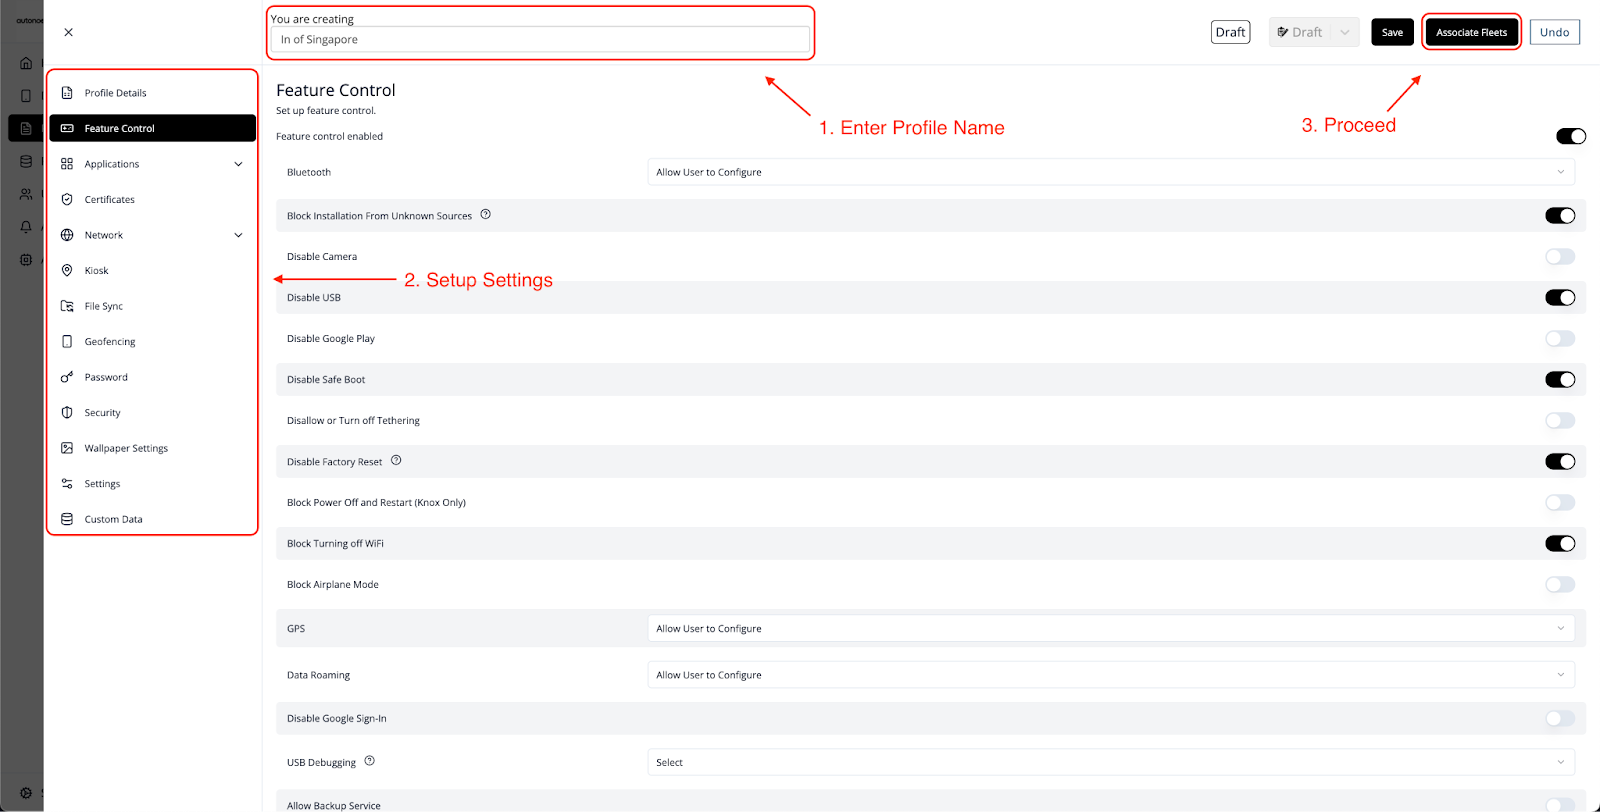
- Enter a profile name (e.g., In of Singapore) and configure settings such as Feature Control, Applications, and more. These settings will apply only when the device is inside the geofencing perimeter.
- Once you’re done with the settings, click the “Associate Fleets” button.
- Select the target fleet (e.g., Production Branch 1) you wish to associate with the profile.
- Click the “Save and Publish” button in the top-right corner.
Important: You must create a target fleet beforehand to associate this profile with the correct device group.
Step 2 – Create an Out-of-Geofence Profile #
- Again, navigate to the Profiles section from the left-hand menu.
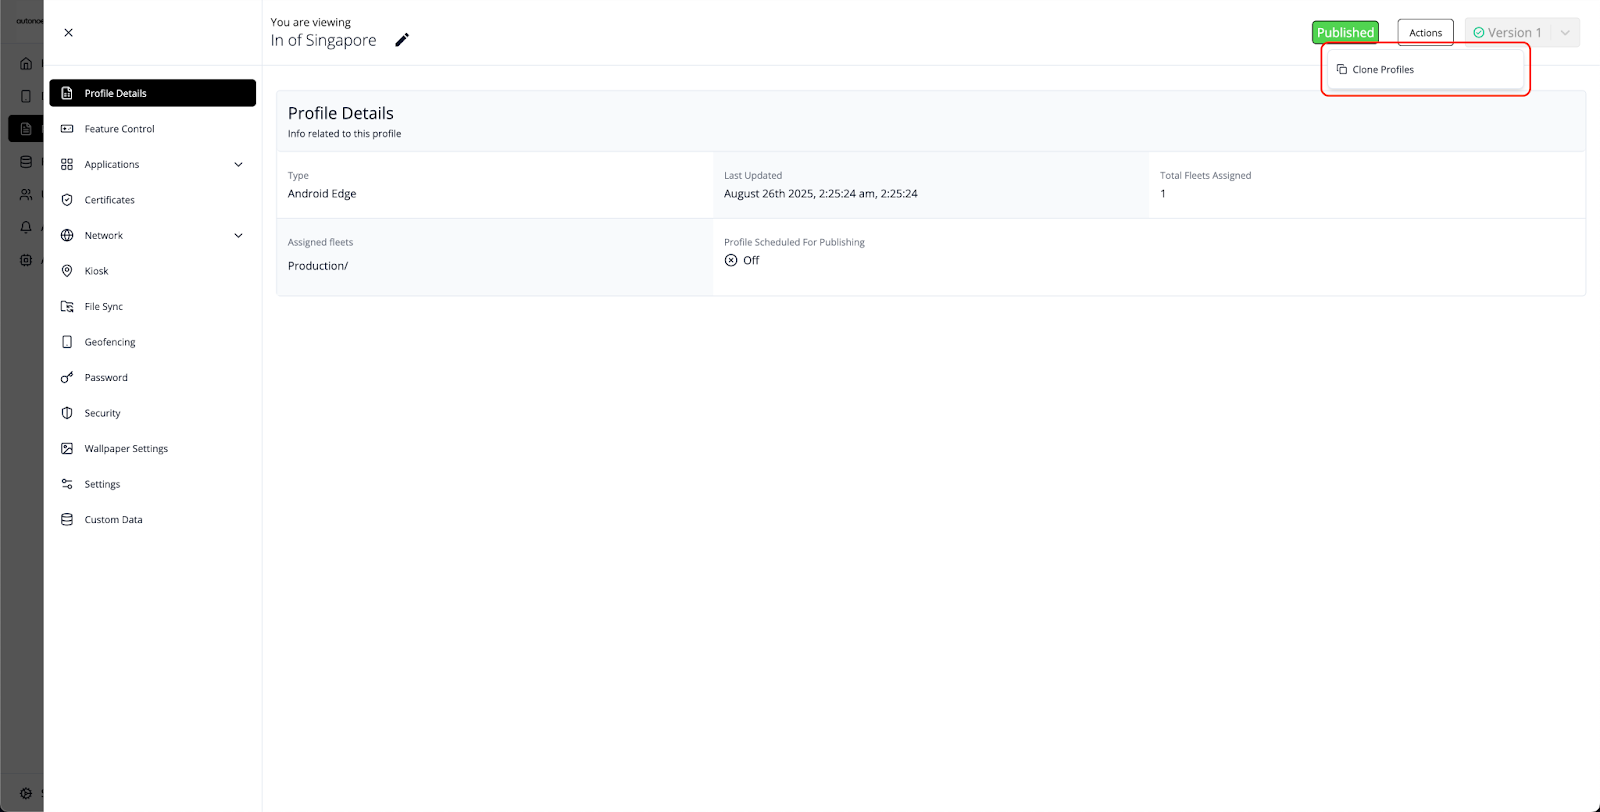
- Click the profile you just created (e.g., In of Singapore), then click the “Actions” button at the top right and select Clone Profile.
- Rename the cloned profile (e.g., Out of Singapore) and modify settings such as Feature Control, Applications, and more. These settings will apply only when the device is outside the geofencing perimeter.
- Select the placeholder fleet (e.g., Out of Geofence Fleet – Active) to associate with the profile.
- Click “Save and Publish”.
- By now, you should have:
- One target fleet (e.g., Production Branch 1) associated with the “In of Singapore” profile.
- One placeholder fleet (e.g., Out of Geofence Fleet – Active) keeping the “Out of Singapore” profile active.
Important: You must create a placeholder fleet beforehand to associate this profile. This fleet doesn’t require actual devices — it simply keeps the profile active.
Step 3 – Setting-up Geofence #
- Navigate to the Profiles section from the left-hand menu.
- Click the profile (e.g., In of Singapore), and then the pencil icon beside the name to enter edit mode.
- Then, navigate to the Geofencing Section and enable geofencing by toggling the switch on the right, then click the “+ Add” button to begin creating geofencing rules.
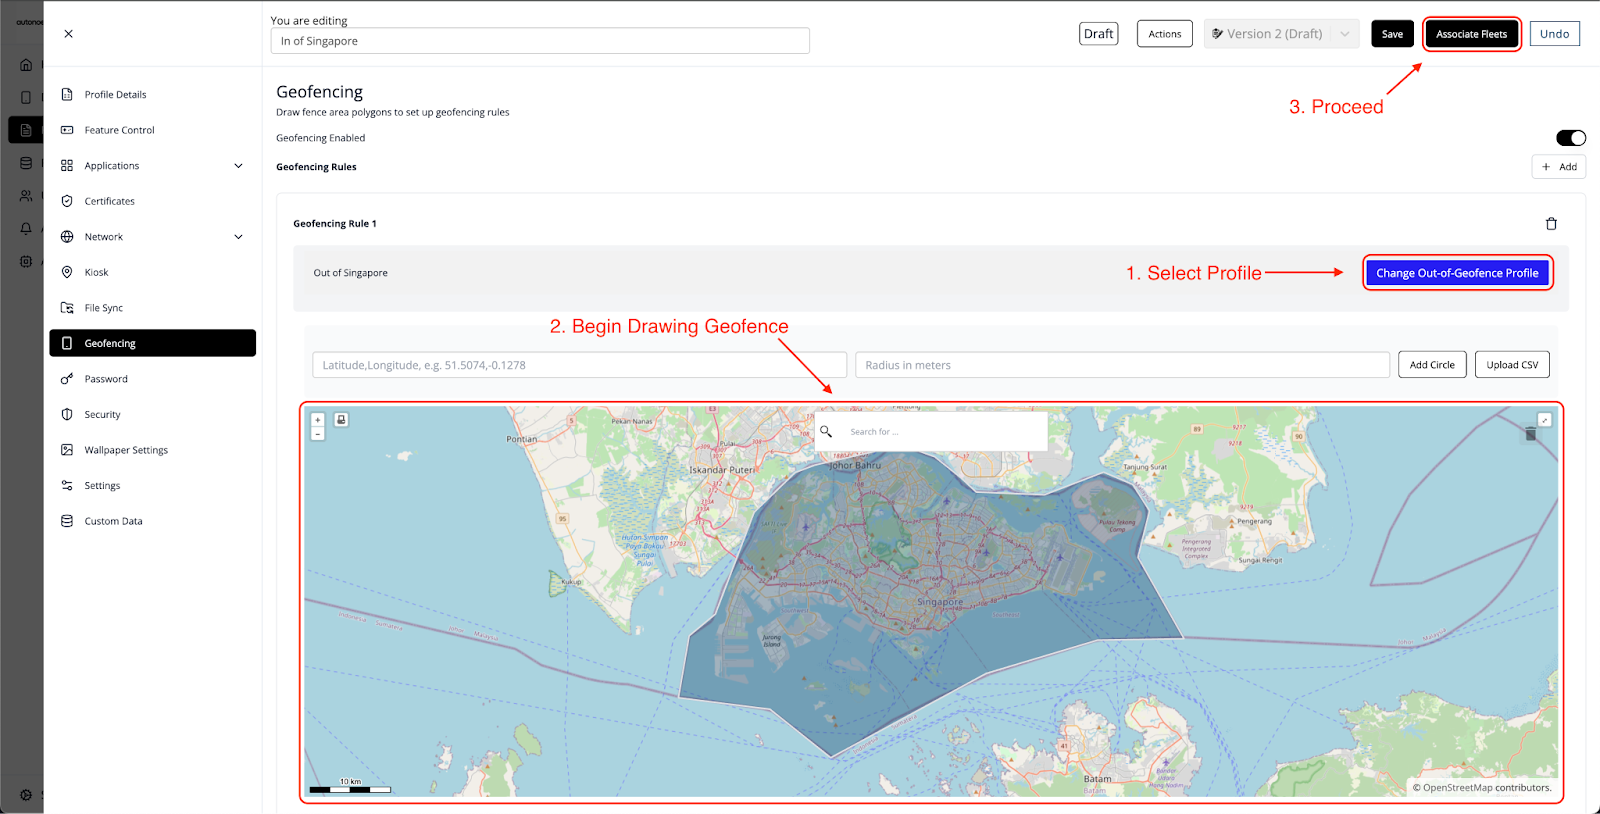
- Click the “Select Out-of-Geofence Profile” button and choose the profile you created earlier (e.g., Out of Singapore).
- You can now click on the map to draw the geofence perimeter.
- After that, re-associate the profile to the target fleet (e.g., Production Branch 1) and click “Save and Publish.”
- Once done, you will see that the target fleet is now associated with one profile. Any device enrolled into this fleet will have the geofencing rules applied automatically.
Note: You may also define the perimeter by entering a circle radius or uploading a CSV. To add multiple geofencing rules, click the “+ Add” button again.
Optional – Upload Multiple Geofences #
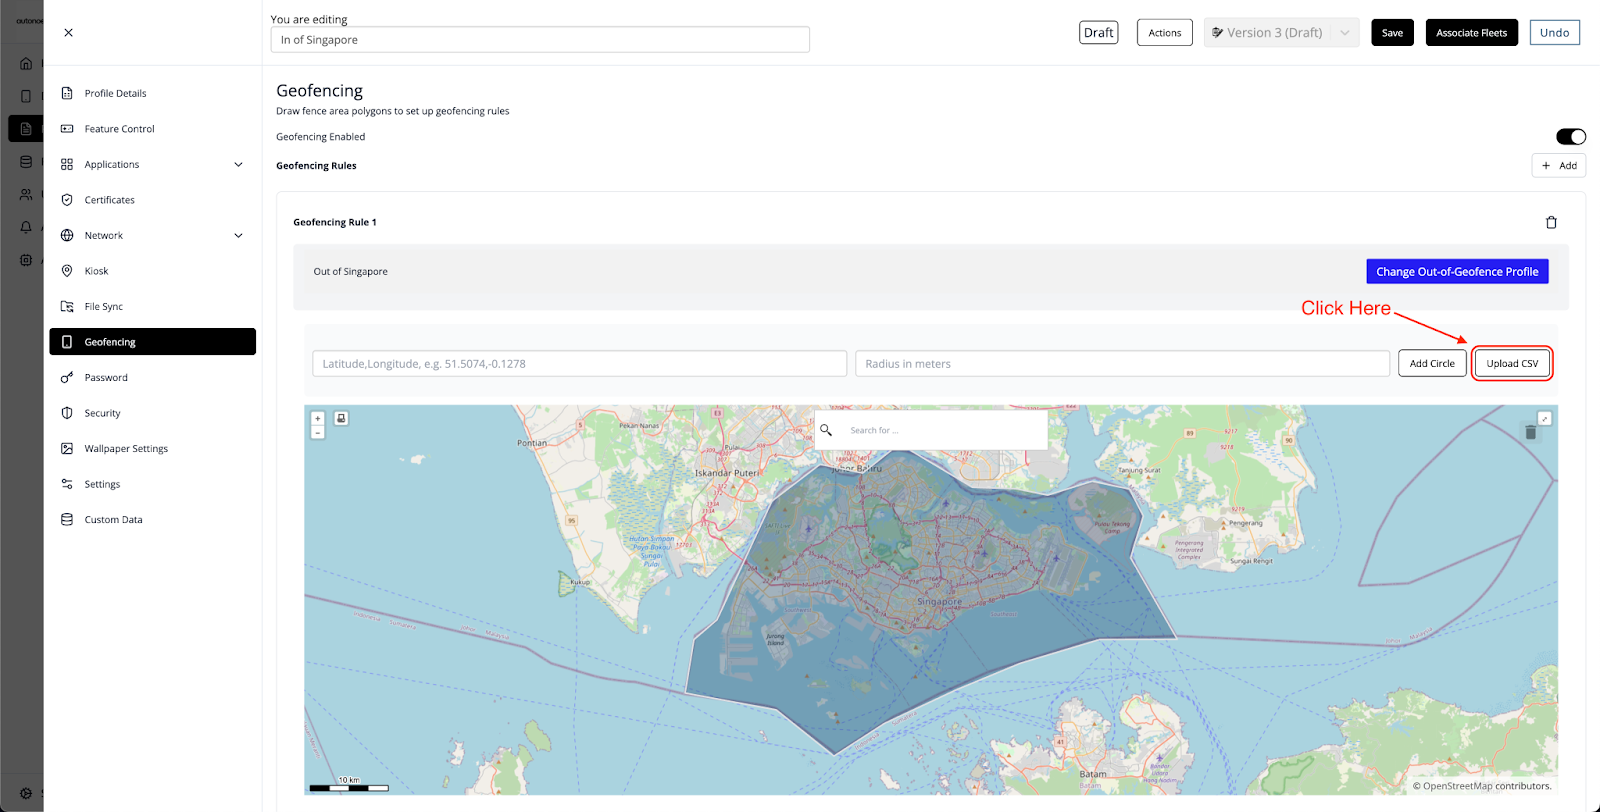
- Click Upload CSV.
- Drag and drop your prepared CSV file. The system will process the file and import all geofences instantly.
Best Practices & Tips #
- Create Two Profiles for Geofencing: Set up one profile for devices inside the geofence and another for when devices are outside. Both profiles are required for the rule to work.
- Apply Multiple Rules When Needed: Use the “+ Add” button in the Geofencing panel to define multiple geofence perimeters within the same profile.
- Understand Location-Based Switching: Autonoedge will automatically apply or revoke settings as devices move in and out of a geofence in real time.
- Always Assign a Fleet: Ensure each geofencing profile has a fleet assigned; without it, the rule will not apply.
- Clone Profiles for Consistency: When creating the out-of-geofence profile, clone the in-geofence profile to maintain consistent settings and reduce the chance of missing important configurations.


